Joe Powder answers to reader’s questions on aspects of the powder coating process.

This article’s subjrct:
Ornamental Craters
Dear Joe,
We are producing Christmas ornaments and after cleaning all the small parts we take them to a workshop which is not ours. This firm has a 12 m3 oven.

There is a wagon to pull the coated items into the oven. One man used WD-40 lubricant to ease rolling the wheels.
After this we started to coat and cure our ornaments. Of course, craters came
one after another. This happened six days ago.
First time we didn’t know why it happened—then I read one of your articles. Could you suggest something (method or chemicals) to clean the oven?
It has no ventilation—just the door where we put in the parts.
Thank you for your answer in advance!
Ildiko K.
Hungary
Answer:
Dear Ildiko,
Thank you for contacting me and I think I can help you. I am glad that you identified the problem, now let’s fix it. Start first with the wheels on your wagon.
Spray them with a solvent. You can use a squirt bottle of acetone (easy to purchase at your local DIY store) or if you prefer, brake cleaner, which is available as an aerosol from your local auto parts store.
Then have your maintenance person use a non-silicone lubricant in the future, perhaps a graphite based one.
Next, I would wipe down the interior surfaces of your oven. A shop cloth soaked with acetone will work. After a thorough wiping, I recommend burning off any remaining residue by heating your oven to a high temperature (this depends on the limits of your heating capability). I would bake for at least two hours and ensure adequate exhaust to eliminate vapors (open the
door slightly).
Before committing a number of parts, please coat and bake a few scrap parts and see if you have eliminated the problem.
If you still see craters you may have to disassemble interior panels of the oven and thoroughly clean them with solvent (e.g., acetone).
Good luck,
All Gelled Up and Nowhere to Go
Dear Joe,
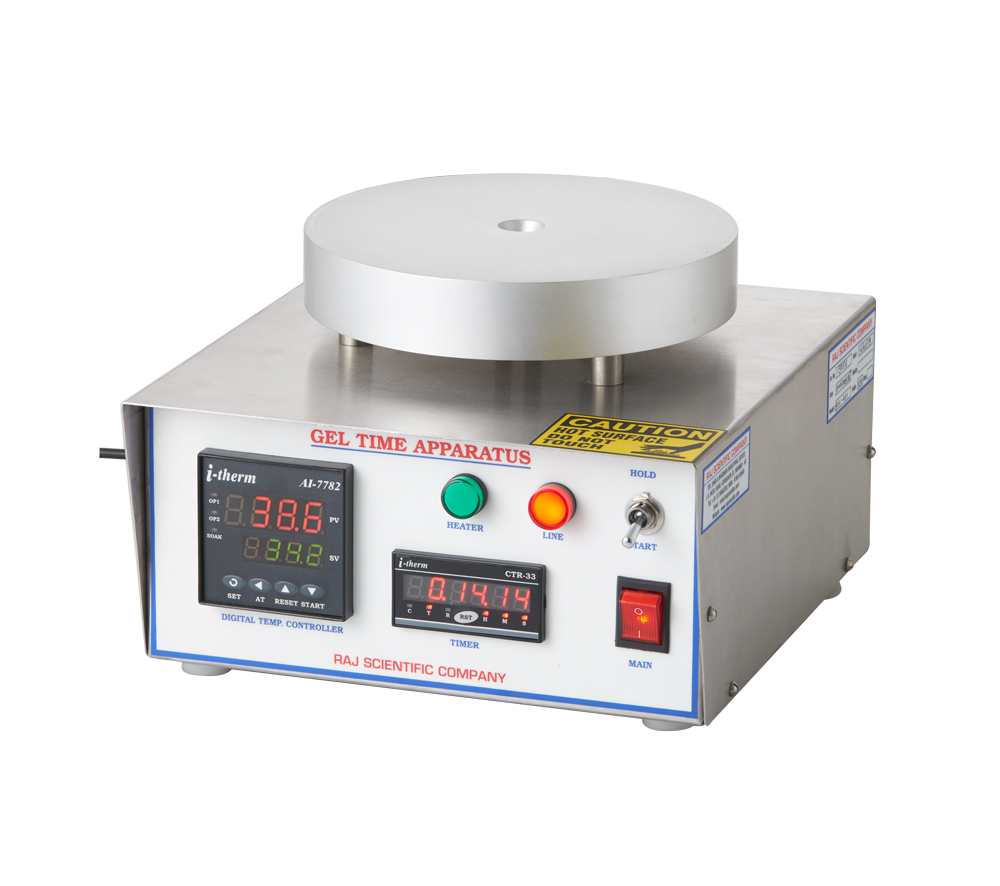
I was wondering if you would be able to help explain the gel time of an epoxy powder coating for me.
I am having some issues with requirements in a current specification. Specifically, can you tell me in your opinion what the variation of a powder should be? We currently state that the gel time is 52 seconds, plus or minus eight seconds.
I would like to know if eight seconds is reasonable, or should the gel time variance be wider? Any insight you can give me would be greatly appreciated.
Sara
Seattle, WA
Answer:
Dear Sara,
It’s nice to hear from you. Here are my thoughts on gel time. First of all, it’s a rather subjective test. Results can be very operator related.
The gel time range you’re proposing is 44 to 60 seconds. That’s a fairly wide range.
If the same operator were running the test this would be too wide; however, taking into account operator variation this may make sense.
What I would do is have three or more operators run the test multiple times to identify the swing in results with a known standard.
Then I would consider establishing a target gel time and collect SPC (statistical process control) data on a number of batches.
Set up arbitrary minimum and maximum values and adjust as you collect more data. I would begin with a plus or minus six second range. Also be sure to run the test carefully and in control.
Use a consistent quantity of powder and measure and record the surface temperature of the gel plate before each measurement.
I hope that this helps.
The Blotch Ness Monster
Hey Joe!
We need a professional opinion with an odd situation happening in our shop with hand railing made out of steel tubing and top coated with a bonded polyester metallic powder coat.
The railing is coming out blotchy around some of the welded joint areas
after curing, but also shows up in some of the straight areas of the tubing.
We did prime these parts with a gel cure and neither the substrate nor the powders being used together are new to us.
We did our normal pretreatment of the metal and none of our application process changed, but this defect is something we aren’t familiar with. The only time I’ve seen something like this is with matte black on tubing and the blotchy areas typically go away once the parts are cool.
We also shot an automotive sway bar with these parts that utilized the same processes of pretreatment with prime, gel cure, and topcoat and the same effect showed up on it.
The texture of the powder is the same throughout the good and bad areas, but the metallic and gloss are different in sections.
Could we be looking at something in the steel fabrication process coming through? We shot a test piece for a third time and have the same issue in these areas.
We are stumped! I am attaching photos to show the issue that we see. Any help would be appreciated!
Thanks a ton!
Tara E.
Wichita, KS
Answer:
Hey Tara,
Wow, this is a wild one. There appears to be a significant difference in appearance not so much on the welds, but on the cross sections of the parts where they are welded together. It doesn’t seem to be isolated just on the welds. Am I right? You mention that you pretreat the parts, follow with a powder primer that you gel, then apply the bonded metallic topcoat and pop it into your oven.
It looks like the powder you are using provides a lower gloss. This may be the key to the puzzle.
Low gloss powder coatings typically rely on a dual cure mechanism to create a smooth low gloss finish. Because the formulation employs two curing mechanisms of differing reactivity, the gloss is dependent upon the coating seeing sufficient heat. Under cured sections will exhibit a different gloss.
The cross-section areas of your parts have a higher metal mass and therefore heat up more slowly than the tubular areas. Consequently, those sections see less time at the recommended curing temperature. This may be the root cause of the problem you are experiencing.
I suggest that you check the solvent resistance of the tubular areas versus the cross sections. If the finish is easily removed on the sections with more metal mass (i.e., cross-sections) compared to the tubular areas, then you are experiencing an under cure situation that is affecting the gloss and appearance of the finish. Try measuring the temperature of the different sections of your parts while they are in the oven.
A temperature data logger is best, but a hand-held noncontact thermometer can work. Bumping up the oven temperature 10-15 degrees could eliminate the problem or a longer dwell time in the oven.
I hope that this helps and let me know if you have any other questions/insights into the problem.
Best regards,
Reference:
https://www.powdercoatedtough.com/News/ID/5213/Ask-Joe-Powder-SepOct-2020